Wednesday, May 25, 2011

Whole Wheat Ginger Cupcakes & Raw Snow Dates

I've never been much of a cupcake person... that is, until my friend Lydia called me from DC and explained that she'd tried the most *delicious* ginger cupcake ever.  She described the texture of the frosting as a bit crystallized and the cake as spicy.  My plan was to make her a similar cupcake when she comes to visit; Here's my shot at it.
 
I decided to make my own powdered sugar for the frosting, which was a bit more grainy than most people might like; still, an easy fix.  I used (sustainable) palm oil (aka veg shortening) instead of coconut oil, because of another friends allergies.  IF YOU CAN, USE UNREFINED COCONUT OIL.  Sorry to yell, I just can't emphasize the importance of good coconut oil enough (like Nutiva.)  Make sure you get unrefined, as regular has no flavor.

I modified a general cupcake recipe to make this, and added a few things myself, but drew the spice amounts from including Jo Ann Sugimoto from the "Just a Pinch" Recipe Club's blog:

1 c.  WW Flour 
1 c. Unbleached Flour (or 2c. total WW - I do this; it works for a heavier cake)
1 1/2 t. Baking Soda
1/4 t. Real Salt
 6 T. Unrefined Coconut Oil
3/4-1 c. Natural Sugar, mixed with 1/2 t. Blackstrap Molasses (a good source of iron)
2 t. Cinnamon
1/2 t. Cloves
1/4 t. Black Pepper
1 1/2 t. Potato Starch or Energy Egg Replacer mixed w/ 2T Warm Water
1 T Flax, Ground
3/4 C. Almond milk
1t. Apple Cider Vinegar

Preheat oven to 350.  Sift dry ingredients.   Cream vanilla, coconut oil, and sugars.  Add "egg," or potato starch.  Then add almond milk and flour dry mixture in 1/4 c. increments, intermittently.  Pour into cupcake molds 3/4 full. 

Sprinkle natural brown sugar on top of the cakes, concentrating on the edges; it will crystallize and make a nice crispy crust.  Bake 17-22 minutes. 

I tried my hand at making caramel and pouring it on top of the cakes before frosting... but the caramel was a disaster!  So obviously I won't share the recipe for that.  If you can make a good caramel sauce, try it! 

A simple coconut oil/ powdered sugar frosting will work well for this.  If grinding your own powdered sugar, add a pinch of egg replacer, corn starch, or potato starch.


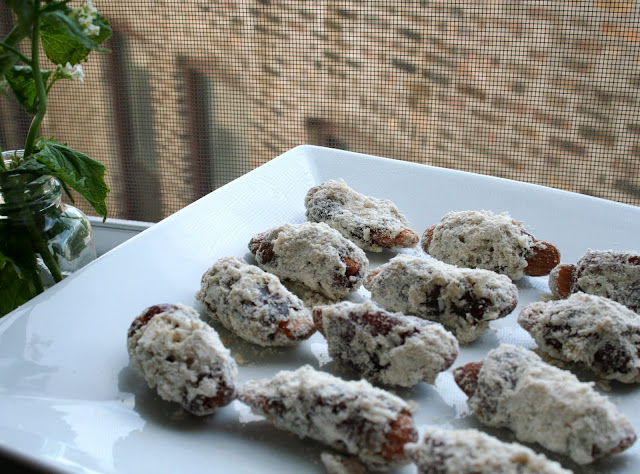
Coconut Snow Dates are easy to make: mix 1/4 cup oat flour (or ground oats) with 1/4 cup shredded coconut.  Stuff dates with whole almonds, coat with a thin layer of raw almond butter, then roll in oat/ coconut mixture.  I think rolled dates are usually cooked in butter before being dipped in the oat/ coconut mixture.

The only issue that I have is with the flour mixture remaining stuck to the dates.  Any suggestions would be appreciated!

Monday, May 9, 2011

What to do with overripe bananas?


CinnaMaka SHAKE
naturally sweetened :)

2-3 overripe bananas, frozen
about 1/2 c water
2 handfulls of almonds (any nut)
1 t maca powder (tastes malty, and adds tons of vitamins)
1t cinnamon

The amount of water really just depends on the size of the bananas.  Blend until smooth.  Just make sure you PEEL the bananas before freezing them.  I've made the mistake of pulling bananas out of the freezer and trying unsuccessfully to saw off black, frozen peels.

Both maca and Green Kamut powder helped me get through caffeine-free days when I was trying to give up coffee.  I think the vitamin content in both may help prevent caffeine withdrawal migraines.

This shake tastes rich and creamy - just like a milkshake should!  The bits of nuts are my favorite part.  For a more hearty or textured shake, consider adding unrefined coconut oil, flax, or chia seeds.  Enjoy!


Sunday, May 8, 2011

Nutty Sweet Quinoa Salad

I admit I'm not a salad-eater (not even pasta salad,) but this is absolutely delicious!  I was trying to think of what to do with my sprouted quinoa this morning... after reading about how "bitter" it can be, I was a little weary of trying to eat it plain, but low and behold I tried a bite: not bitter at all!  I think it would be if I hadn't rinsed it several times (even though most commercial brands of quinoa are pre-rinsed, the saponin-coat of the quinoa seed is what makes it taste bitter, and I did notice bubbles as I rinsed it.)


NUTTY SWEET QUINOA SALAD 

3/4 c. Sprouted (black) quinoa 
1/2 zucchini, grated
corn from 1 raw cob
1/4 c. sunflower seeds
handful of parsley leaves
1/2 lemon
1 T flax seeds
sea salt, cracked pepper
1 yellow mango, added before serving (optional)

Quinoa, a seed rich in amino acid proteins, is related to spinach and swiss chard, and is one of the easiest seeds to sprout!  It can grow green sprouts in only a few days, although I definitely like to eat it before that point.  TO SPROUT QUINOA:  Soak overnight in a LOT of water.  Rinse for 3 minutes, and continue rinsing every 5-10 hours until sprouts appear.  Simple as that.  Quinoa is so easy to sprout, you can just leave it in a jar without using a sprouter lid, and make sure you rinse so it doesn't dry out.  Refrigerate until ready to use.


After the quinoa is sprouted, simply mix everything else with it in a bowl.  The mangoes, pepper, corn, parsley all work well with the nutty crunchy-textured quinoa.  I recon this would make a nice salsa, too, but I think it's just fine on its own.  

I usually look for corn that has yellow and white kernels.

Before adding mangoes
My favorite quinoa is Alter Eco black quinoa, but I'm sure any type will work.  Most people think that red quinoa is more bitter than white (which is supposedly why animals choose to feed on white) but I think that this black quinoa is the absolute best quinoa I've ever sprouted.  Happy eating!

Saturday, May 7, 2011

Adventures in Soymilk making.

Not remembering that your blender has a lid will lead to this vomit-like spectacle. 
Making Soymilk is SOOO cheap (this batch of organic soymilk cost .68 cents) and easy, albeit a pain in the neck.  A Chinese customer at the grocery store that I work at laughed when I told her that I try to make my own soymilk, since machines are made to do that.  Guess I'm a little oblivious - I've only known about rice cookers for a few years.

Ok, soymilk:  it's easy.  After soaking a cup or so of soybeans overnight, rinse them in a sieve or colander and place them blender, adding fresh water until it's about two inches above the soy beans.  Grind to a chunky pulp; this will help break down the bean so that the enzymes are more easily utilized in the cooking process. 

Now bring your soy slush to a boil.  After it reaches a boil, leave it to simmer for about a half hour.  Skim the fluff that rises constantly. 


What the...
 
Fluff!
After simmering your soybeans for 30-40 minutes, strain it, ideally in a cheesecloth-lined strainer.  I always use a sieve, and bits of bean usually remain in my final mixture.  One of these days I'll remember cheesecloth.  Please don't think you're doing yourself any favors by undercooking the soybeans; like many beans, raw soy is pretty much toxic!  The bean needs to defend themselves from being eaten somehow, right? 
Okara makes great soymeat.
After straining, you'll have this mush: it's Okara.  Mix it with oat flour and marinara, coat it in Italian seasonings and whole wheat flour, and bake it on an oiled cookie sheet for an *AWESOME* soy chicken.  I found the recipe on a blog of okara recipes, and it's called "Maria's Un-Chicken."  I don't know who Maria is, but many thanks to her.

Soymilk made this way is somewhat beany-tasting.  But it works.  I drink it because it's healthier than boxed soymilk.  You can add a little salt or agave if you like, but I have many times ruined soymilk trying to make it taste like the stuff from the store, which is actually just watered down and thickened with fillers. 

FOR TOFU: the next step would be coagulation.  I've tried vinegar, I've tried limes... what did I get?  Lime-flavored curdles/ vinegar-flavored curdles (the vinegar curdles were admittedly better.)  It looked just like baby spit-up.  From experience, I'd suggest taking this soymilk and adding a REAL coagulator made specifically for tofu.  Just mix the soymilk/coagulator and pour it over a cheesecloth-lined strainer.  It will harden in the strainer, and the liquid will spill out as it hardens.  After it hardens, you should "press" it with something.  More on this later.

Good luck!
(*NOT KOMBUCHA!)